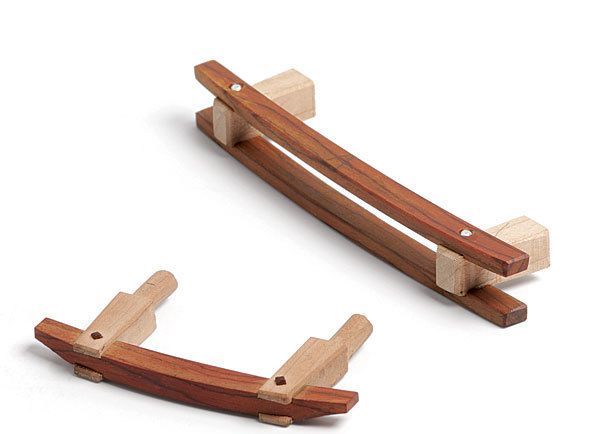
Synopsis: These two pulls will add panache to doors and drawers of all sizes. They can be scaled all the way up for an entry door, graduated in size for a chest with drawers of different sizes, and embellished with brass pins for a different look. Learn how Ross Day makes them, including his tricks for working with very small parts.
The overall shape of a piece of furniture is primary to the impression it makes, but so much also depends on the details. Architect Mies van der Rohe, whose buildings were beautifully made right down to the doorknobs, liked the phrase “God is in the details.” But many furniture makers, anxiously searching for just the right handles at the end of a project, can relate to its corollary, “the devil is in the details.”
My mentor, James Krenov, believed that with a successful piece of furniture the closer you look, the more interesting discoveries you make. In this article, I’ll describe how to make two pulls that should repay close inspection and finish your piece with a flourish.
Both these pulls can be made in a variety of sizes, and can be used horizontally for drawers or vertically for doors. I often graduate the size of the pulls on a single piece of furniture to match the different sizes of the drawers or doors. I’ve also scaled these pulls all the way up and used them on interior and exterior entry doors.
The single-bar pull, made here in cherry and cocobolo and sized for a small drawer, is made with true tenons that join the posts to the drawer front. Alternately, you can join the pull to the piece of furniture with epoxied metal pins, as I do with the double-bar pull.
In both these pulls the bars are curved and the posts are tapered to add visual interest. On the single-bar pull, the bar is also scooped out at the ends on one face; these scoops face downward when the pull is used for drawers; when it’s used for doors, the scoops face outward—toward the hinges.
Made at this scale, both these pulls involve shaping and joining very small parts. For safety, be sure to use zero-clearance throat plates on your tablesaw and bandsaw and use push sticks whenever possible, making custom sticks as necessary.
For the full article, download the PDF below.






Log in or create an account to post a comment.
Sign up Log in