Make a Country Hutch
White pine and simple joinery make this a simple project to build with hand tools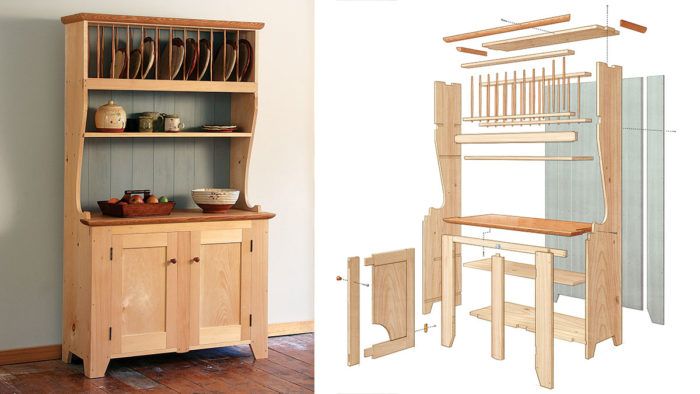
Synopsis: With its open top and decorative side cutouts, this cabinet has its design roots in the 17th century. It relies primarily on nails for strength. The box-joined top, dadoed shelves, bottom, and counter are fixed with nails through the sides, and nailed face frames and cross struts reinforce the structure. Construction is straightforward and a great vehicle for the hand-tool lover.
When I’m making furniture for others, I build in all sorts of styles. But when a piece of furniture is for my own house, I go country. Having grown up in New England, I am partial to the simple pine furniture of our northern settlers. This cupboard, with its open top and decorative cutouts on the sides, has its design roots in the 17th century.
Like the original makers, I worked my white pine boards unplugged. Don’t get me wrong—I don’t build everything by hand. But I really enjoy using hand tools, and when I’m making a piece for myself, I like to indulge a little and skip the machines. The pleasure of the hand work shows in the finished piece, and it feels good knowing all that has gone into making it.
When building a piece with hand tools, it is best to keep things simple. This cabinet relies primarily on nails for its strength. The box-joined top, along with the dadoed shelves, bottom, and counter, are fixed with nails through the sides, and nailed face frames and cross struts reinforce the structure. With the back boards nailed in place at every horizontal, this cupboard is rock-solid. I use traditional cut nails, and I don’t hide them. The exposed nail heads are appropriate to the country style, and the contrast between the silky-smooth pine and hard steel looks great.
I used red oak for the counter, upper molding, spindles, and door pulls. I like red oak and white pine paired together. I left the pine without finish, but used tung oil to bring out the oak’s rich color.
I painted the back boards with slate-blue milk paint. This allowed me to use inferior boards for the back while creating a uniform background for the dishes on display.
I began the hutch by ripping and crosscutting all the parts a bit oversize, then milling them flat. I cut parts to final size only as needed during the build.
The curved cutouts in the sides give this hutch its individuality, and you can design a profile to suit your own tastes.
For the full article, download the PDF below.

Get the Plan
CAD-drawn plans and a cutlist for this project are available in the Fine Woodworking store.






Comments
This was my first big/ major project after building a couple bookshelves and a step stool. I figured if I screwed anything up it would just add to the aura to a “country” piece which is a big reason why I chose this as my first. There’s marks from my hand planes, spoke shaves, the round overs aren’t perfect, doors don’t fit right, but it somehow fits ok with a piece that’s nailed together.
This was a great piece for me to learn with. I needed to glue up both sides, the top and bottom, counter and even the shelves (those were because of bad planning). The first one, holy shit it was bad. I spent more time flattening the glue line than anything. What a pain in the ass. By the time I was finished I had next to nothing to touch up. This project helped me to fine tune my mistake fixing/covering up, mortise and tenon cutting, and finishing just to name a few. While finishing I actually discovered a technique on my door panels I haven’t read or heard anywhere else! I used dye for the first time both water and oil based and I mixed my own shellac. I took grain direction into account and milled my own stock because of it.
While building this I also learned how to better organize my shop. What I would like to have and where.
This project has been a great learning experience and extremely rewarding. My wife and kids are are equally amazed and proud I built this.
Log in or create an account to post a comment.
Sign up Log in