How to Create Custom Moldings with Handplanes
Make your own moldings, from simple to complex, with hollow and round planes.

Synopsis: The secret to producing any molding profile, no matter how complex, is having the right molding planes and knowing how to use them. Matthew Bickford makes molding planes in Connecticut and knows the ins and outs of how to cut convex and concave surfaces using hollow and round planes. Here, he breaks down several profiles to show exactly how it’s done.
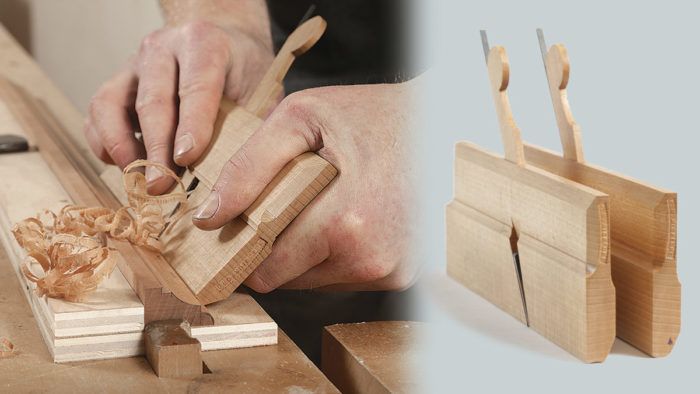
It’s a common quandary: You get 95% of the way through building a piece of furniture, having safely navigated wood selection, milling, joinery, and assembly, only to get stuck at the end on the molding. Despite having a seemingly limitless collection of router bits and shaper knives, you don’t have the means to produce the exact molding you have in mind. So you compromise and make a molding that’s roughly similar to what you really want. But compromising on molding profiles is unnecessary if you have the ideal tools: hollow and round planes.

All molding, even the most complex, is only a series of convex, concave, and flat sections. A single pair of hollow and round planes affords the opportunity to make dozens of these shapes. Add a second pair of planes and the number of possible molding profiles rises into the hundreds. With a larger collection of hollows and rounds, you can make any profile you want.
Once you’ve learned how to cut simple concave and convex sections, you’ll have what you need to move on to more complex moldings.
Guiding hollows and rounds
Hollow and round planes have no fence and no depth stop. This would seem to make them difficult to steer. And it’s true the likelihood of balancing a hollow or round on the corner of a board and producing an acceptable molding profile is, conservatively, 0%. To cope with this, you create guides that serve as both fence and depth gauge.
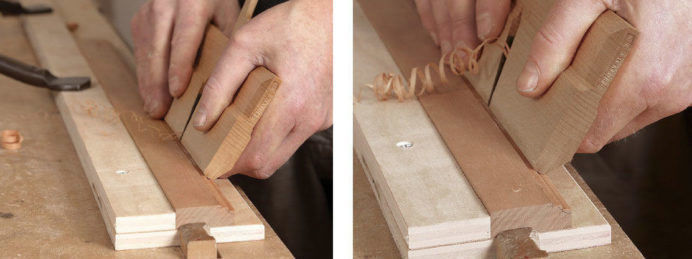
To guide a round, cut a rabbet into the edge of the workpiece. The plane will sit in the rabbet, resting on its two corners, or arrises. As long as the plane is fully engaged with both points of contact throughout the cut, the profile it cuts will be predictable. The rabbet also acts as a depth gauge. When the rabbet disappears, the profile is complete (assuming the rabbet was sized properly). To change the orientation of the arc, change the dimensions of the rabbet.

The hollow is guided in a similar fashion, except that instead of riding in a rabbet, it straddles a chamfer. The two edges of the chamfer guide the hollow through the cut. And just as the rabbet serves as a depth gauge for the round, so does the chamfer for the hollow. When the chamfer has been planed away, the full profile is finished (provided the chamfer was correctly placed).
For both rabbets and chamfers the two points that the plane rides on should be about two-thirds the width of the plane’s sole. Making them too close together defeats their purpose, and making them too far apart prevents the plane from registering properly. I cut the rabbets and chamfers at the tablesaw whenever it’s reasonable; otherwise I cut them with a rabbet plane.
The lack of a fence and depth stop is actually advantageous. Each hollow or round only creates a specific arc. But rotating the plane with subsequent passes—which is possible because there’s no fence or depth stop—allows you to cut a greater proportion of the same arc, and so create many more profiles. All sizes of hollows and rounds are guided and used with the same methods, simply scaled larger or smaller.
Cut complicated moldings curve by curve
The highest hurdle to overcome with complex profiles is viewing them simply. Lay out a complex profile in its simplest form: a series of individual concavities and convexities. Break each portion of a profile apart by placing the vertex of a rabbet at every transition point. Then add the rabbets and chamfers to guide your rounds and hollows, same as before.
Complex profiles often demand more than a single pair of hollows and rounds. Most profiles do. Introduce additional pairs of hollows and rounds into your shop and exponentially increase your options. Not only will you be able to mix and match the hollow of one size with the round of another, but you will also be able to combine multiple hollows or multiple rounds to make elliptical shapes. But that’s a subject for another article.
To view the entire article, please click the View PDF button below:
From Fine Woodworking #272
Matt Bickford is author of Mouldings in Practice, (2012, Lost Art Press). See more at msbickford.com.


Log in or create an account to post a comment.
Sign up Log in